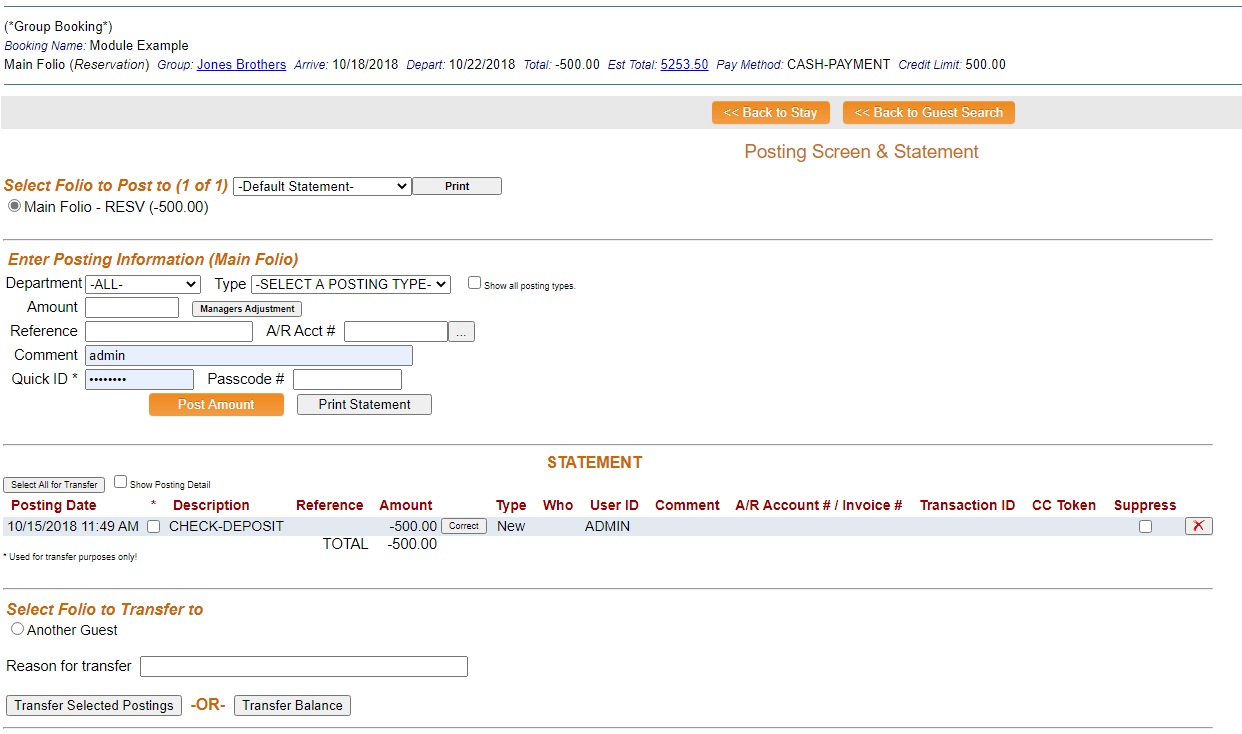
The Post to Folio command provides access to the Posting Screen and Statement window, which allows you to post to a Group Folio just as you would to an individual Guest Folio.
Postings are performed from the Posting Screen and Statement window. The Posting Screen and Statement window shows all of the charges that have been posted to the Group Master account. The group master contains all charges that have been posted directly to the group as well as any charges that have been re-routed to the group from individual reservations (as set up on the Group master's Folio Definitions tab).
Note: By default, your Skyware System will allocate charges to the individuals who book (pick up) the rooms, NOT to the Group Folio. If you wish to put any/all charges into the Group Folio, you will need to add them in the Folio Definitions tab.
Select Post to Folio from the Quick Menu;
OR
Select Post to Folio from the Cashier section of the Full Menu.
Selecting Post to Folio will open the Select Guest to add a Posting screen.
Note: The default setting for the screen is to have the In-House option box checked. To search for a Group Folio, you will need to select the Group option(s) desired, Groups (In-House) and/or Groups (Resv).
Note: You DO NOT have to click <<Press to Search>>, checking any box will automatically display the list of Folios.
If the list provided is very large, use the search fields below your selection options to enter information such as the Booking name, to limit the search results. See Searching for Guests/Groups for more details.
Note: When entering information into the search fields, you do NOT need to hit return or enter between fields - if you do so, this is the equivalent of clicking the <<Press to Search>> link and will generate the search.
From the search results, click the row of the Folio to which you want to post.
The Posting Screen and Statement window will open for the chosen Group Folio.
Note: If you already have a Group Stay or Folio screen open, you may simply click the Postings button () in the local tool bar to open the Posting Screen and Statement window for that Folio.
You can perform several different tasks from the Posting Screen and Statement window, including:
Post charges to the folio by entering posting information and clicking Post Amount.
Print a copy of the Folio statement by clicking Print.
Once the balance is zero, check out that folio by clicking Check Out.
Transfer postings or the entire balance to another folio using the Transfer Selected Postings or Transfer Balance buttons.
The Posting Screen and Statement screen allows you to view all of the charges that have been posted to the Group's account and post new charges.
There are four main sections to the Posting screen.
(There may only be one option here).
Select the Folio (the system will default to the Main Folio, or the folio from which you entered this screen).
You can select a document to be the default statement for this Folio. The default option is the default statement, set in the Property Definitions section. There is a drop-down menu of other documents to choose from. If the document you desire is not available, you can configure one for your property. See How To Create or Customize Your Documents for further details. You can choose to print or email (if an email address has been attached to the Group) the statement. The Check-Out button is there to check-out a guest at the end of their stay. You can click the button to check the guest out if it is the end of their stay. Once the balance is zero, check out that folio by clicking Check Out.
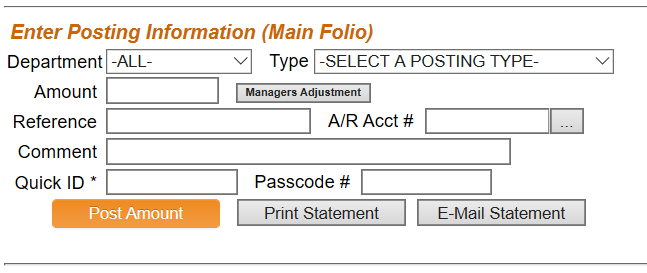
This includes the department the charge was generated from, the type of posting, and the actual amount. Post charges to the folio by entering posting information and clicking Post Amount. You will then be told Successful Post!.
Department: This is a drop-down menu of options. These can include options such as Gift shop, Spa, or Tax. Select one or leave as the default -ALL-. Posting departments are a means of reducing the extremely large potential list of posting types into more manageable groupings.
Note: The following Post Departments come standard with your Skyware Systems system at install: Room, Tax, Payment, and Deposit. You can alter these or add others for your property in the Property and System Configuration area. See Property and System Configuration Overview for more details.
Type: Posting Types or Posting Codes are used to post charges to guests or group folio accounts. These can include options such as massage, room charge, or parking.
Note: The Skyware PMS System comes standard with a room charge (post type 100 which cannot be deleted), taxes, and deposit and payment post types (payment and deposit types must be separate for reporting purposes). Unlimited additional post types can be added for your Property in the Property and System Configuration area. See Property and System Configuration Overview for more details. Editing post types IS also possible, however, altering existing posting types can cause major repercussions within Skyware Systems. If you need to change a posting type please contact Skyware Support before doing so.
Amount: This is the amount of the charge or credit posted to the Folio.
Manager's adjustment: If this button is clicked, you will get the option to select either normal, credit or charge for the amount shown. If you post a Manager's adjustment it will either add a charge (positive amount on the guest's folio) or a credit (negative amount on the guests folio) to the statement, altering the Folio balance due. Using normal will post as a charge or a credit depending on the default set up for the posting type. The Manager's Adjustment allows you (provided you have rights to do so) to adjust and take off a specific amount to a particular posting type. For example if the guest had several banquet charges and you wanted to adjust off a flat amount of "Banquet Food" without selecting an original posting to adjust from, use the Manager's Adjustment feature.
To make a Managers Adjustment, click the Managers Adjustment button, select the Post Type that you wish to make the manager adjustment against, enter the amount, check whether it is a Normal (negative amount on the guests folio) Credit or a Charge (positive amount on the guests folio), enter a reference and comment and click the Post Amount button.
The Manager's adjustment feature can also be used to post to a closed folio, for example a historical or canceled folio. You will be required to enter your pass code that has been set up at your property.
A/R Acct #: Accounts/Receivable. This is a direct billing account. This may also sometimes be called a City ledger (C/L). Use this if the stay is being billed directly to a Company. If posting to one, enter the number in the field or the search icon may be used to open up a pop-up window containing all the available Accounts and allow you to select the appropriate one.
Reference: This will be based on your Property's standard operating procedures (SOPs). A reference could be for example a Check Number. The reference will be printed on the guest receipt, and cannot be changed once posted.
Comment: This will be based on your Property's standard operating procedures (SOPs). This may be anything you wish or left blank. The comment will be printed on the guest receipt, and cannot be changed once posted.
Quick ID *: For Properties using the Quick ID, this is required for any posting types displaying an asterisk (*). These will typically be payments or deposits.
Click the Post Amount button, which will post the amount to the statement.
Click the Print Statement button to review and print a copy of the guest's statement. The statement will just show the postings, adjustments and transfers, but will not show corrections (corrected postings).
Click the Email Statement button, if it is displayed to email a copy of the statement to the guest email on file.
Note: This button will only being displayed if there is a valid email address on file.
The statement is also displayed in the third section, directly below this section.
This lists in a table form all the postings associated with the Folio selected. There are several possible categories which may contain information, but not all are essential.
Posting Date: The date the posting was created. The postings are listed by Date posted.
Description: This is the option selected from Posting Type.
Reference: This is information entered in the reference field of the Enter Posting Information section.
Amount: The amount posted.
Type: This is in reference to why the posting was made. "New" means this was the first time a Posting was made in reference to this charge. A "Correction" is done on the same day as the original posting. Any changes made to a postings on a date different than the original posting will be considered "Adjustments".
Show Posting Detail: This box may be checked or unchecked. By default it is unchecked.
PACKAGE postings are a group of postings set to post as a lump sum. If you need to adjust any postings that are part of a package, click the Show Posting Detail check box above the statement. This will open up the separated postings from the package, allowing you to change the individual components
To change the amount of a posting, click the Correct or Adjust button next to the posting you wish to change, add the correct amount along with a comment and click the Post Correction button. That posting along with the taxes that are associated with that posting will be adjusted to the correct amount.
There are several other columns that may contain data if it was included in the posting (for example if a comment was added, or an A/R account used).
The last column is a little different. This is called Suppress, and every line in the Statement table will contain a check box in this column. The check box may be checked or unchecked. By default it is unchecked. If it is checked, it will suppress the line item from printing; this means this posting item will NOT appear on the printed or email copies of the statement. This may alter the balance on the printed statement.
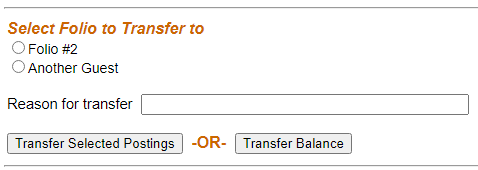
Select the desired Folio radial button to allow transfer.
To transfer postings from one guest or folio to another, select the postings that you wish to transfer and click the "Transfer Selected Postings" button. You can search and select the guest's stay/folio that you wish to transfer the postings to.
Note: Above the Statements table (in section three) there is a button called "Select All for Transfer". If clicked ALL postings listed in the displayed statement will be selected.
The system will list the type as "Xfr" for "transfer" and show who the transfer went to/came from in the in the Who area.
Reason for Transfer: You should type in why the postings are being transferred here. The reason for transfer will show in the Comments area.
NOTE: If the guest has more than one folio and you wish to transfer charges from one folio to another, the folio numbers will appear in the transfer section. Select the appropriate postings, click the folio to transfer the postings to and click Transfer Selected Postings.
Transfer postings to another folio using the Transfer Selected Postings button.
To transfer all or partial balances click the Transfer Balance button and (if needed change the amount and) click OK.
This will take you to the Select Folio to transfer to page where you can search by guest name or room number. Clicking on the guest will initiate the transfer.
Note: The Posting Screen and Statement window is one of the screens available for working through in the Advanced Wizard options; see Group Block Wizard for more details.
Note: If you come to the Posting Screen and Statement after selecting Check-Out, the system takes you into the screen with the payment method from their stay selected by default and the amount owed in the posting amount field. Enter reference and comment information about the posting and click Post Amount. You will then be told Successful Post! and the total amount owed should now appear as zero.
Date Updated November 17, 2020